Showing posts with label DIY. Show all posts

Wednesday, September 30, 2020

DIY Robot Using Recycled Materials for Math & Science Week Activity

September 30, 2020 0 Comments
DIY Robot Using Recycled Materials for Math & Science Week Activity

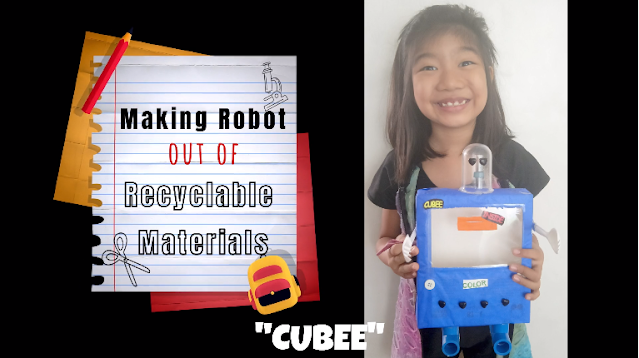
This is the DIY Robot Using Recycled Materials that my 8 year old daughter made for their Math & Science Week Project. She gathered the recycled materials that we have at home and used it to make this DIY Robot. :) 

Here's the short video introduction about her DIY Recycled Robot named Cubee.

The recycled materials used to make this robot are
  1.  Cardboard box 
  2.  Japanese Paper 
  3.  Plastic Caps 
  4.  Pipes 
  5.  Scotch tape 
  6.  Glue 
  7.  Glue gun 
  8.  Buttons 
By the way, you can also use any type of papers or pages from newspapers or magazines to cover the box. :) It's all up to you and your imagination. 

I hope you like this video and comment down below if you have made something like this too.

Sunday, August 11, 2019

Growing Clitoria Ternatea and it's Benefits

August 11, 2019 0 Comments
Growing Clitoria Ternatea or Butterly Pea and it's Benefits

Clitoria Ternatea has a lot of names, it also called Blue Ternatea, Butterfly Pea, Asian Pigeon Wings, Blue Bell Vine, Blue Pea, Cordofan Pea, and Darwin pea. It is an edible herbal plant that has a lot of benefits to our body. I've searched online for the benefits of Butterfly Pea and I was really amazed how this perennial plant has numerous benefits like memory enhancer, brain booster, improves eyesight, diuretic, analgesic, antioxidant, anti-inflammatory, antipyretic, anti-diabetic, anti-asthmatic, anti-anxiety and depression. I think there are a lot more benefits and medicinal use if you do intensive research about the Clitoria Ternatea.

After knowing its benefits, I wanted to have my own Butterfly Pea plant. I am just lucky because my friend gave me some seeds last summer and I planted them in a big container. We made a DIY trellis made up of small water pipes and wires so the vines have more places to climb.

Growing Clitoria Ternatea plant is just easy, it doesn't require so much, just good soil and you're good to go. I planted them through seeds in our compost soil and in more than a week or two, there are already new sprouts. After almost two months, it started to have flowers already. Once it has started growing flowers, it will grow more every day. :)

I used organic fertilizer on my plants like:
  • Crushed eggshells - rich in calcium which helps plants grow healthy and strong. It also reduces the acidity of the soil.
  • Rabbit manure  - a great fertilizer that is rich in nitrogen and phosphorus, nutrients that plants need for healthy growth. 
  • Banana peels - rich in potassium, phosphorus, and calcium. It also keeps the aphids away.
  • Rice water - (yung pinaghugasan ng bigas bago iluto). I actually don't know what are the actual benefits of using rice water on plants but based on experience, my plants and vegetables grow well and produce more fruits and as for the Clitoria ternatea, it produces lots of flowers even some of my seedlings have started producing flowers in a month.
I've searched for the benefits of minerals our plants can get on rice water and I've found this post:
"Washing rice causes rice to lose up to 7% protein, 30% crude fiber, 15% free amino acids, 25% calcium (Ca), 47% total phosphorus (P), 47% iron (Fe), 11% zinc (Zn), 41% potassium (K), 59% thiamine, 26% riboflavin, and 60% niacin." [Source: http://www.christopherteh.com/blog/2017/11/washed-rice-water]

Clitoria Ternatea, Blue Ternatea, Butterfly Pea, Asian Pigeon Wings, Blue Bell Vine, Blue Pea, Cordofan Pea and Darwin pea

Today, it gives us a lot of flowers which is more than what we can consume. So, I give some to my friends and family and let them try it too. :) They were so eager to try it when they knew about its benefits. ;)

Clitoria Ternatea is commonly used as a tea, some call it Blue Tea as the natural color of its flower will fade when boiled or put on hot water. The tea doesn't taste that bad and you can make a refreshing juice when you add lemon or calamansi and honey to the extract that you collected from the flower.
 Here's a reference to a study made on Clitoria Ternatea and its benefits on its subject/s:
Clitoria ternatea , commonly known as Shankpushpi, is widely used in the traditional Indian system of medicine as a brain tonic and is believed to promote memory and intelligence. We examined the effectiveness of alcoholic extracts of aerial and root parts of C. ternatea at 300 and 500 mg/kg doses orally in rats in attenuating electroshock-induced amnesia. Extracts at 300 mg/kg dose produced significant memory retention, and the root parts were found to be more effective. [Source: https://www.ncbi.nlm.nih.gov/pubmed/21214440]
Treatment with 100 mg/kg of Clitoria ternatea aqueous root extract (CTR), for 30 days in neonatal and young adult age groups of rat, significantly increased acetylcholine (ACh) content in their hippocampi as compared to age matched controls. Increase in ACh content in their hippocampus may be the neurochemical basis for their improved learning and memory. [Source: https://www.ncbi.nlm.nih.gov/pubmed/12490229]
Evaluation of the antiasthmatic activity of Clitoria ternatea L. roots. [Source: https://www.ncbi.nlm.nih.gov/pubmed/21575696]

Tuesday, January 10, 2017

Recycling Tin Cans as Succulent Containers

January 10, 2017 0 Comments
If you have some tin cans on your home, you can use them as plant containers. We have a few tin cans from the luncheon meats that we bought at the grocery. So, I tried to recycle it. It's actually my first time to recycle a tin can and used it on my succulent plant. It turned out good and I am loving it!
You can use it as a table centerpiece or anywhere in your home or office, as long as it can get enough sunlight. It's also a great way to give as a gift to a succulent lover or use it as giveaways for parties or any events.


It was just easy doing this DIY recycled tin cans. If you already have the tin cans, the first thing you should do is remove the label, wash and clean it and let it dry.

When it's already dry, you can start making a few holes at the bottom of the tin cans. I used a hammer and nail on my recycled tin can.

Once it's done, you can start putting some little stones at the bottom for drainage. Then you can start adding the soil and your chosen succulents in it. You can also add some stones on the top soil as decorations. :)


You can make this DIY containers for any plants, I am so into cactus and succulents that's why I choose it on this container. If you are into cactus and succulents too and you live in Davao, you can join our group in Facebook which is Cactus and Succulents Davao and Cactus and Succulents Mindanao. :)

I just can't stop looking at these beautiful items that I found online and wanted to share this to everyone, especially those who loves Cactus and Succulents. If you're a cactus and succulent lover, like me, you know what I mean... These cactus and succulents items are really cute and it's good for home decorations, just like this Cactus Candles. Aren't they cute?


This LED Cactus Light is also cute, I'd love to have one of these in my room... Such a cutie cactus night lamp, not just for kids but for adults too... ;)


These cactus throw pillows are great addition to your sofa, i just love it's cute designs...

Tuesday, August 6, 2013

DIY Pom Pom Curtains

August 06, 2013 0 Comments
I am currently addicted to pom poms, specifically yarn pom poms. I just made a DIY Pom Pom Curtains made of yarns in different colors.  I was about to use the pom poms I made for a different project but I got excited and made it all to a curtain. 

I love the fact that my baby loves it, the different colors attracts her. There's just one thing though, she can't resist and grab the pom poms in the window! She would really make ways just to get the pom poms, like climbing in the chair then to her mini table and then to the window... 


Anyways, the process in doing the yarn pom poms is really simple, you just need a lot of patience if you want to make more. There are different kinds of process to make the pom poms and here are the techniques to make it easier for everyone to make it.


This is the process that I did to make my pom poms. First, I made two card-boards in a shape of a circle like the ones on the photo above and started rolling the yarns in it....

Or you can try this step too:

I recently find out a way to make yarn pom poms in bulk! This tutorial could have saved me a lot of time doing the pom poms. Well, there's still a next time because I will be doing more pom poms and make it as a curtain for my daughter's playroom... :)


You can experiment and mix different colors too. Try different colors that would blend and you'll create a colorful pom pom. 

By the way, after you have made your pom poms, you will be needing a thread and a needle. You can use a yarn too or a transparent nylon thread. Measure the length of your window so you'll have an idea on how long would your thread be and then you can now start sewing the pom poms in the middle... :)

This DIY craft is really nice especially on occasions like birthdays, christening or just a decoration in your house or your kids room or playroom. 

There you go, I hope those tutorials had helped you as it has helped me... 'Til next DIY crafts! ;)

Wednesday, July 31, 2013

DIY Charm Bracelet

July 31, 2013 0 Comments
I really want to make my own charm bracelet. I bought different musical charms a year ago because I wanted to make one but unfortunately forgotten all about it. Anyways, my hubby bought me a set of tools that I needed to make jewelries, so I finally decided to continue that overdue project. ;)


Here are the materials you need to create your own DIY Charm Bracelet:
  • Bracelet or Chains (your choice: silver or gold plated)
  • Charms (depends on you, mine were musical charms: guitar, musical notes, microphone and trumpet.
  • Jump rings (used to connect your charms and bracelet or chain).
  • Pliers (used to open and close the jump rings).
It's just easy to make these charm bracelet when you have all the materials ready. All you have to do is connect your charms to the jump rings and from the jump rings, connect it to your bracelet or chain. Here, take a look at the final output... :)

Tuesday, July 23, 2013

DIY Bobby Pins

July 23, 2013 0 Comments
I've been wanting to do this Do It Yourself (DIY) Bobby Pins but I always forgot to buy the materials needed to make one. So, yesterday, I finally had the chance to go out and bought the materials. I saw some cheap buttons in the Mall before and so I went back and bought the good ones. 

I got so excited when I got home. I can't wait to wash it all because most of the buttons where dusty and I don't want to work on dusty things, hehe... Anyways, after I've finished washing them with water and alcohol, I arranged them and started to stick them all with the use of a glue gun.

The process is really really simple! Put your desired buttons on the bobby pins  and clips then stick it with a glue gun. Wait for a few minutes and it's all done! :)

And here's the results:


Aren't they cute? I ran out of buttons so I might check out for more next time when we go out... :) Those two clips with the wobbly eyes aren't button, I just tried to put it on those cutie circles I found here at home and it turned out cute... ;) My little one liked it too, the blue one looked like cookie monster, she kept on saying 'cookie mommy'... :)